
Enabling Wake On WAN/power savings for your home network / server
The following post describes my personal setup in my home network to conserve power and how you can possibly do the same in your own home or small business setup. By implementing advanced standby / hibernation setups, you can have significant savings on power bills and reduce your carbon footprint. I will show how you can use power saving techniques without it becoming impractical. I should warn you this post can get quite technical in the end and may not work in your setup (totally depends on your network router).
Power saving techniques
There are several ways to save energy when it comes to working in a (Windows based) home network. You can for instance lower the total power consumption of your PC by switching the Power Plan in Windows 7. By doing so, your PC will turn off unused hard disks, use less power for wireless radios and go to standby sooner when your user session is idling.
 Windows Power Plans
As we all know, you can put a PC in standby or hibernation instead of shutting it down. Even though shutting a computer completely down will save more energy than putting it in standby, it can be very useful to have the computer resume its duties quicker. I don’t put my workstations in standby or hibernation as an SSD as a boot drive makes cold boot a snappy 20 seconds wait.
Downsides to being green
The biggest problem with implementing power saving techniques is that they make the use of your computer (or in my case, my personal server based on Windows Home Server) less practical. Services running on your computer available to your local network are disrupted by these green initiatives. In the Enterprise space we have seen a great shift from using large amounts of systems (idling mostly) to using less and concentrated virtualization servers making systems and entire datacenters more efficient without it interrupting the (often SLA secured) services.
Of course the home or small business setup can be too small to warrant huge virtualization implementations. They would probably use up more energy making the whole deal rather pointless. To overcome the downsides of unavailability during standby, we have been resorting to Wake on LAN for a while now. The idea is that you wake up a computer that is in standby or hibernation remotely so it can do your bidding (RDP’ing into it, using webservices, transfer files et cetera) by sending a special command to the sleeping computer.
My weapon of choice
My personal setup is based around a Windows Home Server computer. This headless device (e.g. display / keyboardless) is stored in my utility closet next to my fiber router and TV cable connections and does all my bidding through connections of the wireless and wired network. By default Windows Home Server (and most home server software) is designed to run 24 hours a day consuming a lot of power when you don’t even need it. Think about how many hours you are out and about, cooking and sleeping when you simply have no need for it’s services. In my case I barely need it services for about 3 hours on a work day and 5 hours on a day in the weekend. So why have it run 143 hours a week when I’m not even using a computer or am at home?
To resolve this issue, I’m using LightsOut, a plugin for my Windows Home Server that automatically puts my server into hibernation when it’s idling for more than a period of time (for me, 10 minutes). It monitors sources (computers, IP addresses, load on CPU) to see if there are users using the server via a computer on the local network. By installing a small client on home computers, it has a direct connection between the two peers. It can not only put other computers in standby but also wake each (wired connected) computer up to make a backup. Basically the server won’t sleep when any of the Home Server connected computers (or other monitored sources) are using it and until all sources are disconnected for at least 10 minutes. The small client software sends a little Wake-on-LAN packet to the server upon resume/boot of a client in the event the server isn’t awake at that time.
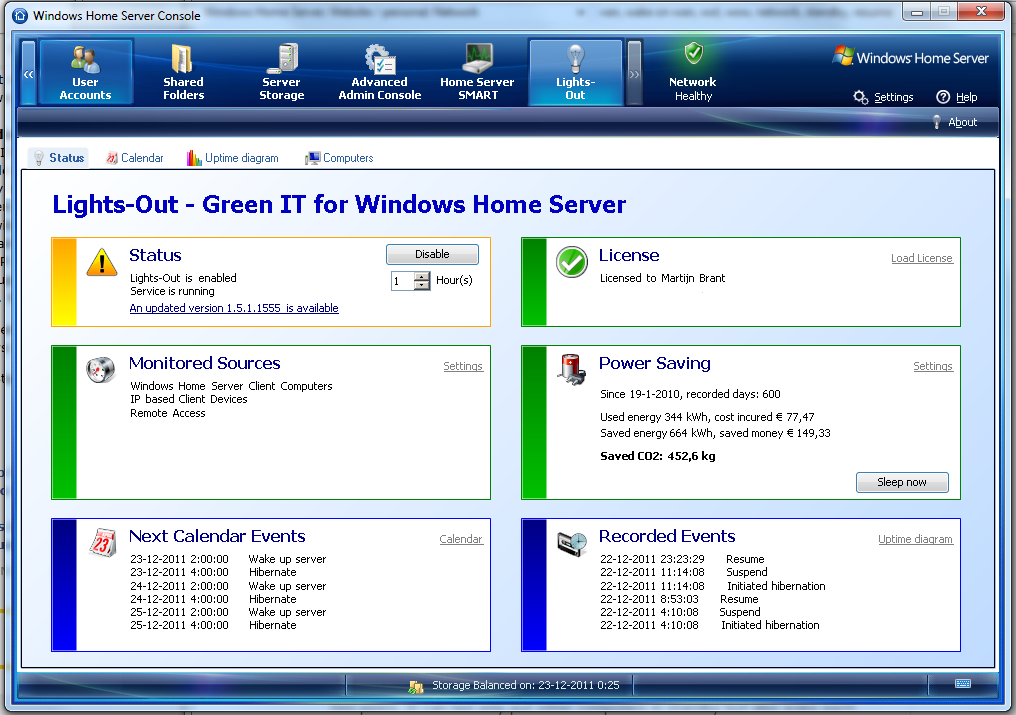 Lightsout for WHS
Even though the provided client software provides an option to wake the computer in the event it’s sleeping, waking up the server when not using a PC can be more of a hassle. Using the LightsOut plugin it’s easy to make the server sleep and wake on command using the provided software, however wanting to do this without the LightsOut tools and the WHS connection can be rather annoying but not impossible.
Waking the server without the extra software
Because the server is configured to respond to Wake-on-LAN commands a rather simple packet on UDP port 9), you can use any tool that support WOL commands to be send to the server. A number of Windows and smartphone apps can do this for you as long as you know the MAC Address of your server (also called the Physical Address). To find out the physical address of your Windows Home Server, you’ll have to make a Remote Desktop connection to it and start a command prompt on it. After that run the command ipconfig /all on it and look for the needed information:
 ipconfig showing mac address
In my case, the physical address starts with 00-15-17-31 (or 00:15:17:31) depending on how you want to write it down. By sending a special WOL packet to your local subnet formulated using this MAC address, your server will wake up. You’ll want to test this thoroughly because even attempting Wake on WAN.
Making it even more practical (Wake on WAN)
Even though having the ability to wake up the server without a computer by using a smartphone app is great, you’ll still always need the MAC address on you and be on the local network. Not so great if you’re visiting a friends house and your server has gone to sleep.
To resolve this, we’ll have to forward the so called Magic Frame (WOL command) through your internet router and into your LAN subnet. Note however that not all consumer-minded routers can do this or will allow you to do this. Please refer to PortForward.com for instructions on setting up custom port routing on your own router. Regardless of your make and model, you’ll want to login into the web interface of your local router and port forward all traffic on UDP port 9 to your local subnet.
Why route all traffic on port 9 to your entire subnet when this can be considered a possible security issue? Because you’ll want the packet to reach your server. Most routers and all switches route traffic based upon the target MAC address. However you’ll setup the port 9 routing based upon IP addresses (to get techy with you, OSI layer 3 and it will need to be routed to a layer 2). Normally a router has an ARP table and a ARP cache to translate IP addresses into MAC addresses and of course even consumer routers need this as it is a big part on how TCP/IP networks work.
The biggest problem you’ll face when setting up Wake on WAN on a consumer router is the inability to see or let alone modify the ARP table (which most business and enterprise class routers and switches can do without breaking a sweat). This is because ARP tables aren’t something to mess with and can break your working network when misconfigured. Most consumer-minded routers cache a physical address for a small period of time in it’s ARP table cache however not always and never for a longer period of time making it highly unreliable.
To overcome the lack of reliable IP to MAC resolution and ensure the target MAC address receives the Magic WOL packet without the router knowing where to send it (because of the lack of information in the ARP table), we’ll have to send the packet to the entire subnet, effectively shouting the packet out loud to all computer on the network. Again this can be a serious security issue if mishandled. You should never route large amount of traffic to the entire subnet as it will flood your network. However, in this case the packet is very very small and contains no usable information apart from the physical address of your server. Other computers will receive the packet but ignore it as the packet itself will dictate who it wants to react.
The biggest problem you’ll have setting up Wake on WAN
As explained, you’ll need to route Wake on LAN packets (so called Magic Frame) to the entire subnet when using consumer grade routing equipment. The biggest problem you’ll face is most consumer grade router will simply deny you the option to route traffic to your entire subnet (a good idea as doing so is a huge security threat and most certainly bring your network speeds to it’s knees). Some will simply deny you the option to configure it while other routers may allow the configuration but instead completely ignore your wanted configuration. Luckily my D-Link DIR-655 using firmware version 1.31EU does allow me to configure it and it even works!
 D-Link router
Try and setup routing of UDP port 9 to your local subnet announcement address (usually something like 192.168.1.255 or 10.0.0.255). Some (or most) interfaces will not allow you to do so. Some tips to circumvent this:
- Try disabling Javascript in your browser to prevent the web interface from filtering your input.
- Try upgrading or downgrading your router firmware.
- Try looking for alternative firmware for your router like dd-wrt.
- Try changing your subnet mask effectively changing your announcement address (because of the changing boundaries of your subnet). Most router UIs that block subnet routing assume you’re using 255.255.255.0 making the announcement address x.x.x.255 and thus filter on the last number > 255.
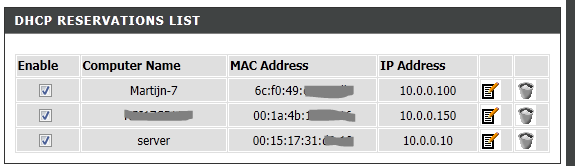
Sometimes it’s still not enough to just simply route all traffic on UDP port 9 to your entire subnet as some routers still won’t know how to route the traffic to a physical address as it doesn’t know (or simply forgot due to cache timeout) where to send it to. You can try to trick your router into remembering your servers’ physical address by adding it’s IP and MAC address to the DHCP exclusion list:
 DHCP Reservations list
Great! Now with routing all setup, it’s time to test your new Wake on WAN setup. You could try this by asking someone else to do this or by sending wake up command via your smartphone disconnected from your WiFi and send the packets to your internet IP address. I found this to be a hassle when testing and found two great little websites specifically to send WOL commands to your IP: wol.dtools.net and wakeonlan.me. Get someone / your smartphone / these sites to send your public IP address the proper WOL commands for your servers physical address and your server should now rise from it’s deep sleep!
Now to get fancy…
I wanted this system to be friendly and easy enough so my girlfriend could also make use of it. So I made a little server status and Wake On Wan website for us both. It contains both uptime checkers and links to wake up our server. Want to wake the server to watch a little network-hosted movie on the media player using any type of internet browser (e.g. iPad) or maybe get some file from the home server when at work? Just a little visit to a simple website and the home server is running in no time.
 Server UI
This little mini site does nothing but host some quick links to often used systems and does a little check to see if specific services / computers are connectable from the web. It’s written in PHP and uses the following two bits of code:
GetServerStatus() using fsockopen()
WakeOnLan() using socket_create()
Throw the two scripts together on a simple public-facing always-on PHP host and you’ll be able to always turn on your systems without the need of special configured software or the need to be on the same subnet as your server! The extra shortcuts will make it easier for your better half to use your geeky infrastructure.